8 月 . 15, 2024 12:59 Back to list
Step-by-step guide for installing T-bar ceiling grid systems in residential or commercial spaces
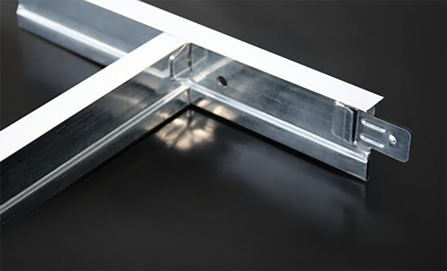
How to Install T-Bar Ceiling Grid A Step-by-Step Guide
Installing a T-bar ceiling grid can dramatically transform your space, providing a sleek and modern look while also concealing wiring, plumbing, and ductwork. This project can be tackled as a DIY endeavor with careful preparation and the right tools. Below is a comprehensive guide on how to install a T-bar ceiling grid effectively.
Step 1 Gather Materials and Tools
Before starting your installation, it’s essential to gather all necessary materials and tools. Here’s what you will need
Materials - T-bar grid pieces (main runners and cross tees) - Ceiling tiles (designed for your grid system) - Wall angle trim - Expansion clips - Hangers/anchor bolts for support - Suspension wire - Drywall screws (if needed for wall angles)
Tools - Measuring tape - Level - Chalk line - Wire cutters - Screwdriver - Power drill - Safety goggles
Step 2 Measure and Plan
Begin by measuring the dimensions of your room. Determine where the grid will be installed and the level at which the ceiling tiles will hang. It’s crucial to ensure that the ceiling is level; any inconsistencies can affect the appearance of the grid and tiles.
Once you have your measurements, sketch a layout of the grid. Typically, T-bar grids are installed in a 2x2 or 2x4 foot configuration. Plan where the main runners (the long horizontal pieces) will span, and indicate where the cross tees will extend between them.
Step 3 Install Wall Angle
Next, install the wall angle trim around the perimeter of the room. This trim will support the T-bar grid and should be level. Use a laser level or a standard level to ensure accuracy. Fasten the wall angle to the walls using drywall screws, placing them approximately 24 inches apart.
how to install t bar ceiling grid

Step 4 Hang the Main Runners
Once the wall angle is securely in place, you can begin hanging the main runners. Start at one end of the room, and use the chalk line to mark the desired height for your main runners on the wall angle. Attach hangers at regular intervals, typically every 4 feet, to the ceiling joists above.
Attach the main runners to the hangers, ensuring each is level and supported adequately. If necessary, make adjustments to the suspension wires to achieve a uniform height across the entire grid.
Step 5 Install Cross Tees
With the main runners in place, it’s time to add the cross tees. These will slot into the main runners to create a grid layout. Ensure that the placement complies with your design layout, confirming that the spacing accommodates your selected ceiling tiles. Secure each cross tee in place; they should fit snugly and form a stable grid.
Step 6 Insert Ceiling Tiles
Now that the grid is fully assembled, it’s time to install the ceiling tiles. Depending on your chosen tiles, they might simply drop into place or require some adjustment for a perfect fit. Begin from one corner and work your way around the room, ensuring each tile is flush with the grid.
Step 7 Finishing Touches
Inspect the installed ceiling for any uneven tiles or gaps. Make any necessary adjustments to ensure a neat appearance. If desired, you can paint the grid to match your decor or to further hide it from view.
Conclusion
Installing a T-bar ceiling grid is a manageable DIY project that can enhance the aesthetic of your space while providing practical benefits. With careful measurement, planning, and execution, you can create a ceiling that is both functional and visually appealing. Remember to prioritize safety throughout the process, wearing appropriate gear and ensuring that your workspace is clear of hazards. Enjoy your newly transformed room!
-
Revolutionizing Interior Design with Ceilings t grid Suspended SystemNewsOct.29,2024
-
Revolutionizing Ceiling Design with ceiling access panel with Gypsum Tile WaterproofNewsOct.29,2024
-
Revolutionizing Interior Design with PVC Gypsum Ceiling: A Comprehensive GuideNewsOct.29,2024
-
Elevating Interior Design with High quality Mineral Fiber Ceiling TilesNewsOct.29,2024
-
Revolutionizing Interior Design with PVC Gypsum Ceiling: A Comprehensive GuideNewsOct.29,2024
-
Elevating Interior Design with High-Quality Mineral Fiber Ceiling Tiles: A Comprehensive GuideNewsOct.29,2024


